Golf carts have come a long way since being just caddie companions. Now they serve multiple uses from golf courses to neighborhoods for residential homes and industrial establishments. Understanding its electrical components — specifically its battery wiring diagram — is paramount to its proper function. In this post. We provide complete details regarding 36 Volt Ezgo Golf Cart Batteries.
Understanding 36 Volt Systems
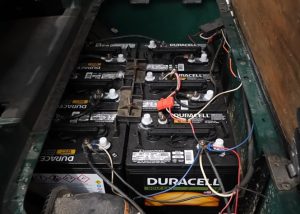
Before diving into an electrical wiring schematic. You must understand the fundamental principles of a 36-volt golf cart system. A standard 36 volt Ezgo cart typically comprises six 6-volt batteries wired together into an electric power source of 36 Volt Ezgo Golf Cart Batteries. These typically are deep-cycle led-acid batteries designed to deliver consistent energy over long durations.
36 volt Ezgo golf cart battery wiring diagram steps
Wiring batteries correctly is key for maintaining the proper operation of any golf cart and its security. Here is a step-by-step guide with illustrations that can assist with connecting 36 Volt Ezgo Golf Cart Batteries correctly:
Step 1: Collect all Required Tools and Equipment
Before embarking upon any task, be certain you possess all of the required tools and equipment.
Step 2: Clean Six 6-Volt Deep Cycle
Batteries Wipe their terminals clean using a battery terminal wrench/pliers and wire brush
As always when working with batteries, safety must always come first. Always wear safety glasses and gloves to protect yourself against acid splashes as well as electrical risks.
Step 3: Battery Inspected and Cleaned
Check each battery carefully for obvious damages or corrosion, then clean its posts and terminals using either battery terminal cleaners or a baking soda & water mixture. Finally, use a wire brush to clear away any corrosion present on its posts & terminals.
Step 4: Battery Installation
To properly position and synchronize all six 6-volt batteries from EZ-GO on your golf cart battery compartment, place three on either row in an even manner and two stacked rows containing three of each type – that should result in six 6-volt cells being properly connected in every way possible.
Step 5: Battery Wiring
If you would like to know how to connect batteries correctly, referring to this diagram can assist.
Attach the positive terminal (+) of one battery located on one row to the negative end (+) of another battery situated within that row by connecting with an electrical cable.
Continue the series connection by connecting the positive terminal (+) of each battery in the first row to its negative end (+).
Follow these same steps for each successive line of batteries to create an alternating circuit in which the positive terminal on one battery connects with the negative terminal on another for the 36-volt system.
Step Six: Connect Accessories
If you own devices like light bulbs, horns, or radios that connect directly with two batteries (positive on one and negative on another), connect their positive terminal to both batteries’ positive side via an appropriate fuse to protect from electric surges.
Step 7: Pilot Test Your Golf Cart
Once all wiring has been completed, start up your golf cart to test its functionality and ensure all equipment functions as planned. Make sure it moves effortlessly along its journey and that all equipment works as it should.
Conclusion- 36 volt Ezgo golf cart battery wiring diagram
Correctly wiring batteries inside an EZ-GO 36-volt golf cart is key to its efficiency and security. By following the step-by-step instructions and wiring diagram in this post. You will ensure your electric system works optimally, giving users hours of hassle-free rides around courses or neighborhoods alike. Always put safety first when dealing with batteries or electrical equipment!
Frequently Asked Questions 36 volt Ezgo golf cart battery wiring diagram
What purpose would a diagram illustrating battery wiring to a 36-volt golf cart serve?
An electrical wiring diagram for batteries is essential when wiring six 6-volt batteries together into series to form 36-volts for use by your cart, to guarantee its proper and safe functioning and security.
What battery type will power my 36-volt Ezgo golf cart best?
Golf cart owners should opt for deep-cycle lead acid batteries designed specifically to provide consistent power for longer. They provide power when needed without draining batteries quickly or leaving gaps between charges.
What equipment and tools will I require to properly wire batteries?
Needed are six 6-volt batteries along with battery terminal cleaner, wrenches/pliers battery terminal cleaner, and safety glasses and gloves to get started.
What measures of safety must I observe while working with battery packs for golf carts?
Always wear safety glasses and gloves during electrical wiring on a golf cart to protect yourself from acid splashes or sparks of acid that might ignite. Be sure that it has been switched off before commencing electrical connections on it.
What steps should I take to keep my battery terminals and posts clean?
Apply a cleaner designed specifically for battery terminals or a mix of water and baking soda to effectively cleanse posts and terminals of battery packs, cleaning away corrosion with wire brushes as you go along.
How can I organize the six batteries within their respective compartment?
Arrange batteries into two rows. Three batteries should go in each row.
Where should the battery go in a 36-volt system? What’s the appropriate wire sequence to connect its terminals?
Use an electrical cable to attach both ends of each battery in your beginning row with positive and negative ends connected, then join them at their third battery to form one series of connections in that row – this process should continue up the column of batteries until all columns have been connected.
Why does proper management of batteries matter?
Wiring batteries together to form an electric system of 36 volts requires careful coordination to add up their respective voltages evenly, otherwise, problems with electricity, inefficiency, or safety risks could ensue.
Are there any ways I can connect other devices to my golf cart battery’s system?
Your battery system provides ample power for attaching lighting fixtures, audio devices, and more, so make sure that you use appropriate fuses to protect those devices against electrical surges.
What steps should I take once I have finished wiring my device?
Once the batteries have been secured to your golf cart, switch it on and test its functionality – checking that everything runs smoothly while all equipment works as intended.
What’s the ideal time and method of inspecting and maintaining my golf cart battery?
Routine battery maintenance should include checking batteries for corrosion before cleaning their posts and terminals as needed. In addition to monitoring water levels when necessary.
How long do batteries for golf carts typically last and what can I do to extend that period? On average, batteries for golf carts last four or six years with proper care extending that timeline further. Routine charging should help extend that longevity as should staying away from large discharges while keeping their battery clean and organized.
Can I upgrade my golf cart to run at 48 volts instead of 12?
Upgrading to this new voltage may require making major modifications such as changing the controller and motor settings – for this type of change. It would be wise to consult an expert before undertaking such adjustments yourself.
How can I find an experienced individual to assist me with the electrical system of my golf cart?
Golf cart dealers or repair shops near you should also offer professional assistance for issues or upgrades with golf carts. Furthermore, electronic vehicle specialists with expertise in golf carts may also be of service if any arise.